Bridging the Arts Education Gap: A Solution for California Schools
Why
Arts Education Matters
Why Arts Education Matters Proposition 28: Elementary arts education is a critical driver of student success, delivering measurable academic gains and social-emotional development that fundamentally transform educational outcomes, particularly for underserved populations: Increased compassion, empathy,
Increased compassion, empathy, and school engagement
Significant gains in writing and math, particularly for English language learners
Increased college enrollment rates among disadvantaged students
5x less likely to drop out of school
4x more likely to be recognized for academic achievement
Proposition 28:
The Funding Implementation Gap
Proposition 28 provides ongoing state funding to enhance arts education across all PK-12 public and charter schools in California, with 80% of funds designated for credentialed arts teachers. While this legislation guarantees annual funding, schools face a critical challenge: a severe shortage of qualified arts educators prevents them from accessing these allocated resources. Fortunately, a recent waiver provision now enables schools to achieve compliance through alternative delivery methods, creating a substantial market opportunity for innovative curriculum solutions that can bridge this gap.
Our
Solution
Discover Your Inner Artist (DYIA) Curriculum
A complete, K–6 Visual Arts program designed for K–6th grade classroom teachers that enables schools to:
Access Prop 28 funding through the Waiver program
Deploy immediately with existing classroom teachers (zero arts experience required)
Scale cost-effectively without hiring specialized staff
Product Components:
Core Curriculum Package:
Comprehensive Teacher Guidebook with philosophy, assessment methodology, and 30-week scope & sequence
7 standards-aligned units built on California Visual Arts Standards and Elements of Art
Differentiation resources for diverse learners and teaching contexts
Digital platform with supplemental materials and ongoing resources
Implementation Support:
Professional development (asynchronous and in-person options)
Student art kits to complement instruction
Competitive Advantage
We’re addressing a legislatively-created market with a compliance-ready, pedagogically-sound solution that requires no specialized hiring. Schools get immediate deployment capability, measurable student outcomes, and full regulatory compliance—all while maximizing their Prop 28 allocation.
This isn’t just curriculum—it’s the bridge between available funding and educational equity.
See the curriculum in action
Explore a Sample Lesson
Now that you’ve seen what DYIA offers, take a look inside the teacher guidebook. The Grade 3 lesson below shows how materials, teaching prompts, creative exploration, and reflection come together in one 45-minute art lesson.
UNIT 1:
LET'S
MAKE
ART!
LET IT
RIP:
TWO
MATERIALS
Spotlight Arts Standard: 3.VA:Cr2.1: Complete personally satisfying artwork using a variety of artistic processes and materials.
Lesson Length: 45 minutes with students plus prep time.
Overview
Students begin their artistic journey by exploring materials and using a sketchbook for brainstorming, play, and reflection.
Many students are new to using a sketchbook and may see art only as a finished product.
This first lesson emphasizes playful exploration and helps students become familiar with the materials in their art kit.
Use this time to introduce and model norms for distributing supplies and clean-up routines.
Setting Up the Engagement:
Materials: Sketchbook, art kit, paper (any kind—construction, scratch paper, variety of colors and types), and glue.
Set-Up/Clean-Up Tips: Have the Teacher Sketchbook available (yes, teachers should create a sketchbook for themselves, too!) and materials/art kits ready to pass out.
Pre-Work: Set up the kit materials with student names in advance; consider writing student names on the sketchbook covers; start or complete a ripped paper collage in your sketchbook; decide whether you want to cut 8½”× 11″ paper in half to conserve paper use.
Setting Up for Success
Student Milestones:
I will create a collage of torn papers.
I can learn how to care for my art materials.
I will check my own progress at the end of the lesson using a two part prompt.
+
Teacher Guideposts:
Record students’ responses to checks for understanding using the formative observations checklist in the addendum and/or Teacher Portal.
Track students’ progress through learning targets and art standards.
Step 1: Hook & Set up (5 minutes)
Introduce the sketchbook as a critical part of the artist’s journey, somewhere to track art exploration and record ideas. In addition, demonstrate the clean-up protocols you want students to follow in the care and keeping of their art kits. Explain key terms in the hook and check for student understanding with a whole group question and answer.
Direct students to sit in a circle. Ensure art materials are ready for distribution.
“Today, we will be starting a journey together as artists! The first step for all of us is to get to know our materials through exploration and experimentation.”
Show the blank sketchbook.
“This is a sketchbook. You will get your very own today and will use it all year as an artist. Before we start, give me a signal: Have you ever had your own sketchbook before?”
Use familiar classroom signals (drum roll, hand signals, etc.) to gather information about students’ previous experiences. Recognize those who have had their own sketchbooks and invite one student to share how they used it.
Recognize students who have not had one before and share your excitement to see how they will use it this year.
+
Check for Understanding:
Ask students, “How do you think artists might use a sketchbook like this?”
Go to the Teacher Portal for examples of artist sketchbooks. Ask students what they notice or observe about how artists use them.
Listen for these responses: sketching, trying new things.
“This sketchbook will be your safe space to try out your ideas and make your art. You will create a sketchbook habit for yourself and use the sketchbook to create a portfolio or story of your art this year. Sometimes, we will use other types of paper for special projects, but most of the time, the sketchbook will be where we create art. Today, we will each receive our own sketchbook and art materials.”
This is your opportunity to establish how you want students to set up/clean up their materials for each art session. Though we have some suggestions in the addendum, do whatever works for your classroom! Review these steps now.
+
Check for Understanding—Turn and Talk:
“Tell a partner what steps we are going to follow for picking up and returning the art kits each time.”
Walk around and confirm students understand how to move about the room during art time. Reteach and practice your procedure, as necessary.
Step 2: Independent (30 minutes)
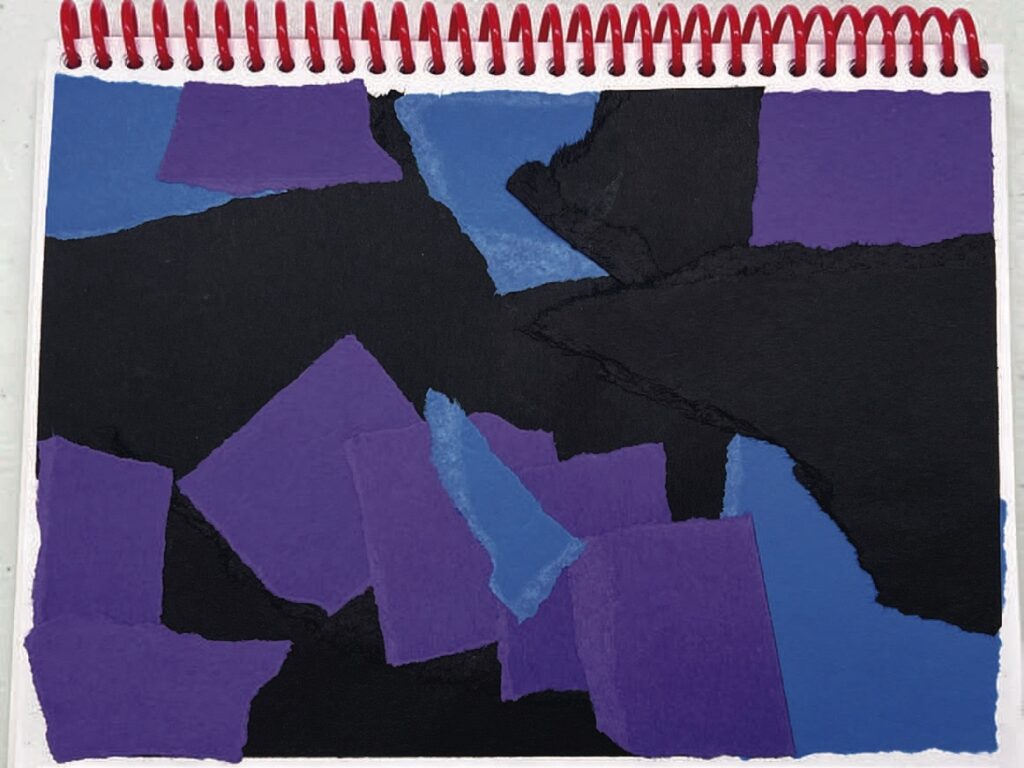
Students cover an entire page of their sketchbooks using only ripped paper and glue. Use the observations checklist to support and monitor student progress.
Transition to Independent Work: Tell students, “Today, we will start our sketchbook habit and experiment with paper. By the end of this lesson, you will have explored paper by trying several different ways of ripping and tearing.”
Implement your strategy for passing out art kits. Once every student has theirs, explain how artists use experimentation to learn about their materials and get ideas. They will try something numerous times or try something new to get inspiration for their art.
Create a checklist on your whiteboard or easel showing students what is expected. Point to the pictures as you set up what students will be doing. You will come back to this at the end of the lesson for their self-evaluation. Show students an example of the finished paper experiment (layering or collage).
“Please choose ONLY two colors or types of paper to use for your experiment. Now, I want you to cover one whole page of your sketchbook completely in small pieces of paper, but you can’t use scissors—only your hands. No white showing through! Can you use different-sized pieces? How will you make this without scissors? Will you try to create a pattern or make it random? Don’t forget, your only tools will be paper, glue, and your hands, plus the sketchbook.”
During independent work, check in with students and ask them about their progress. See Step 4 for tips.
Step 3: Connect & Reflect (10 minutes)
Students share in a Turn and Talk to check their understanding. Then, reflect on the lesson as a whole group to reconnect with the lesson objective.
Transition: Ring the bell and ask students to put their materials down. Practice putting away the art kit. Model it first while thinking aloud. Then, have a student model it silently while you narrate what they are doing and the class observes. Invite all students to follow the steps for art kit clean-up but keep their sketchbooks out.
+
Turn and Talk: Ask students, “Now choose something (ONE) you would like to share about your paper collage and turn to your partner. Turn and talk for 2 minutes.” If time is short, take volunteers to share as a whole group.
+
Close—Check for Understanding:
Return to the checklist you created. Ask students to check themselves using hand signals (two thumbs up, one thumb up, no thumbs up). “Did you use at least two colors or types of paper and cover the whole page of the sketchbook? Did you share what you did with a friend?” Check in individually with students if they express no thumbs up.
ELA Connection: How do you feel about your new sketchbook? Are the results personally satisfying to you? Ask students to write three to four sentences to reflect.
Whole Group Discussion/Extension:
Did you make a plan, and did it change or did you do exactly what you said you were going to? That’s okay either way!
How do you feel about your new sketchbook?
Which paper did you use the most?
What was the most challenging part for you?
Step 4: Adaptations, Modifications & Reteach – Things to try!
Extension: Students may wish to create an image with their ripped paper. Go for it!
Reluctant Artist Tips: If students are struggling with the rip, glue, and place steps, pause the class and have a student model what they are doing to make their page. Students may struggle with trying to undo a placed paper after gluing. Encourage students to roll with it and be creative with how to recover from a mistake. Can they put new paper over the error?
English Language Learner Support: Say the color names of papers while holding them in your hands. Model the process while speaking each step slowly. Support students during Turn and Talks with sentence frames they can repeat: “One thing I would like to share about my book is …”
See tips for How to Talk About Art.
You Inspire Young Artists. Let Us Support You.
Reach out to learn how our curriculum can bring more creativity, confidence, and joy into your classroom.